Building a compact Steam Machine, in a dead XBOX shell.
Building a compact Steam Machine, in a dead XBOX shell.
TL;DR: This XBOX has been replaced with a basic computer in for casual gaming, media center use & works with Steam Link.

So why do this?
I wanted to play a few older games that I have and actually complete them but also a few which I didn’t own but also reasonably old, primarily the ones that come to mind (and that I’ve been playing are the Lego Star Wars 1 & 2, Lego Harry Potter, Lego Movie Game, you get the idea….).
As I collect old consoles and games I owned a few of these already (Lego Star Wars on PS2, and Lego Movie on XBOX 360) and I started with the Lego Movie game. However as I play these at night I have the voulme reasonably quiet but the 360 is really noisy!
Secondly I only owned the Lego Movie game on the 360 and while I had the Star Wars games on the PS2 I would have wanted to get the saga on the 360 along with the harry potter games which all combined was near £50 even for used copies.
So I decided to make a computer to play on instead, I had the ITX motherboard from a previous project and had already some of the parts onhand from other projects. I just needed a case which I considered 3D printing. But then remembered I had a dead XBOX.
This XBOX was fully dead and not repairable to the best of my knowledge as I had attempted repair following multiple guides and just made it worse. (Plus I have one fully working XBOX in good condition too).
This project involved multiple skills with some being ones that I’m not the best at, however I am really happy at the final result. These were 3D Printing, Electronics, overclocking & undervolting, painting, Sanding,
Now, the finished unit
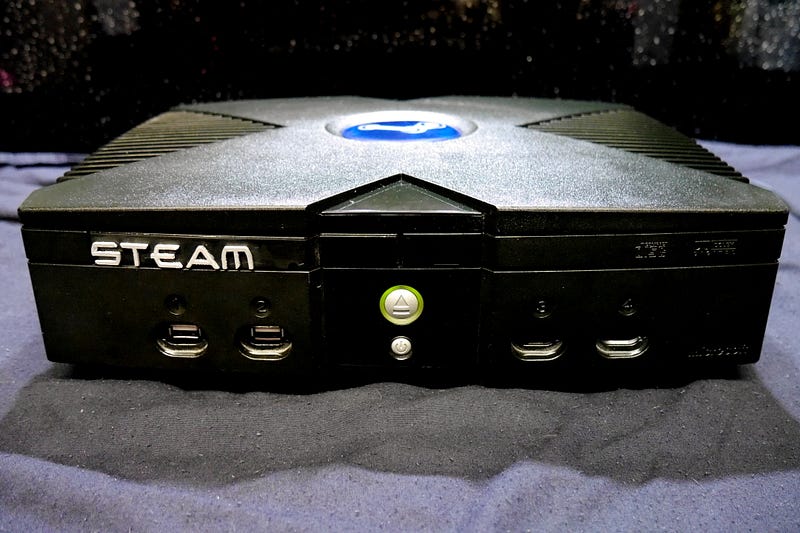
The XBOX letters have been replaced with STEAM (3D Printed using resin and painted). 2 of the controller ports on the left side have been replaced with USB sockets, the other 2 are original and wired up so original controllers fully work. The power button is wired up and the LEDs are wired to indicate power.
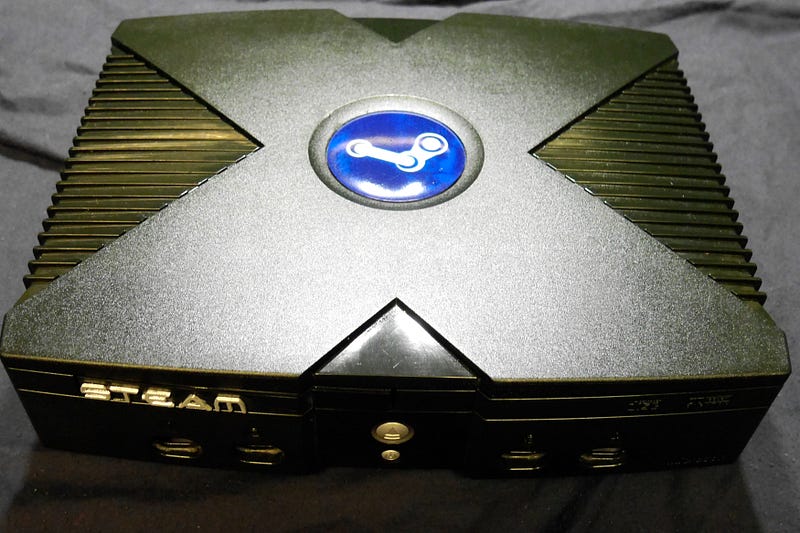
On top the XBOX badge has been replaced with the STEAM logo, this was 3D printed in blue resin at a 50 micron layer height. Sanded down to 1200 Grit, clearcoated on top. The logo filled in with silver acrylic paint. Then the back sprayed in a few coats of blue spraypaint to provide it with a deeper blue colour.
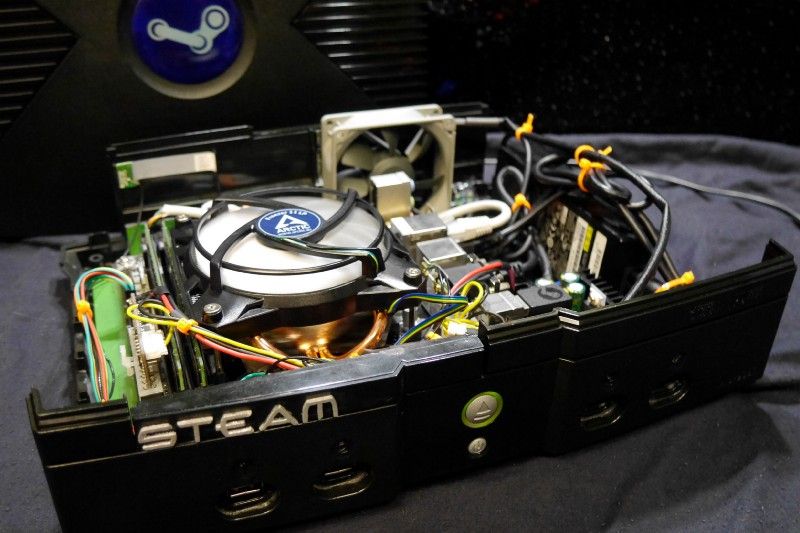
So let’s open it up to see inside.
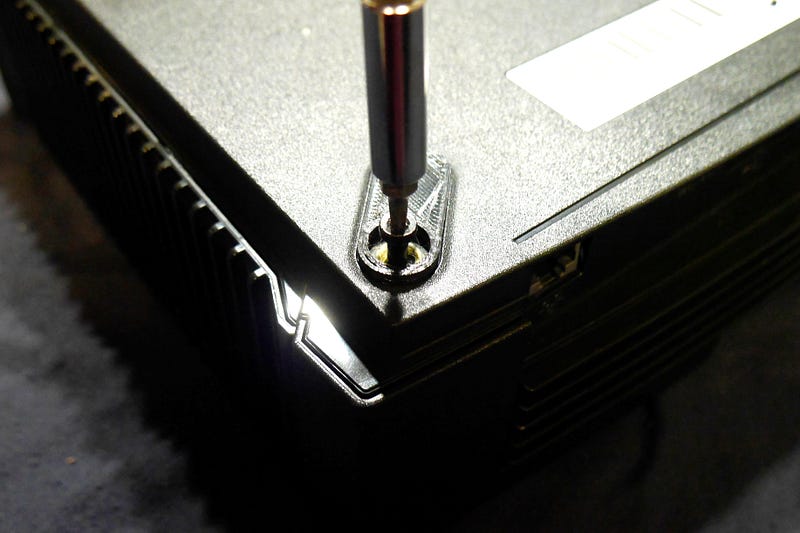
While the XBOX has 6 screws I find the 4 in each corner is good enough and one is actually obstructed by the contents. However with feet on these can be hard to access so as I had misplaced the original feet from when I originally opened it 4 years ago to attempt to repair so I 3D printed some in Flexable fillament then revised them to be able to still access the screws and glued them in place.

Inside the ITX box. It is indeed a bit of a tight squeeze with the internals. So let’s see what’s inside!

First off the computer specs, the computer is about as good as it needs to be without then spending a lot of money.
Inside is a Gigabyte GA-H81N ITX motherboard with an Intel i3–4330 and 16GB of DDR3 1333MHZ Corsair memory (altough overclocked to 1600Mhz) and an 120GB mSATA SSD from integral. The cooler is an Arctic Freezer 11 Low Profile, with additional cooling from a Noctua Redux 80MM at the back.
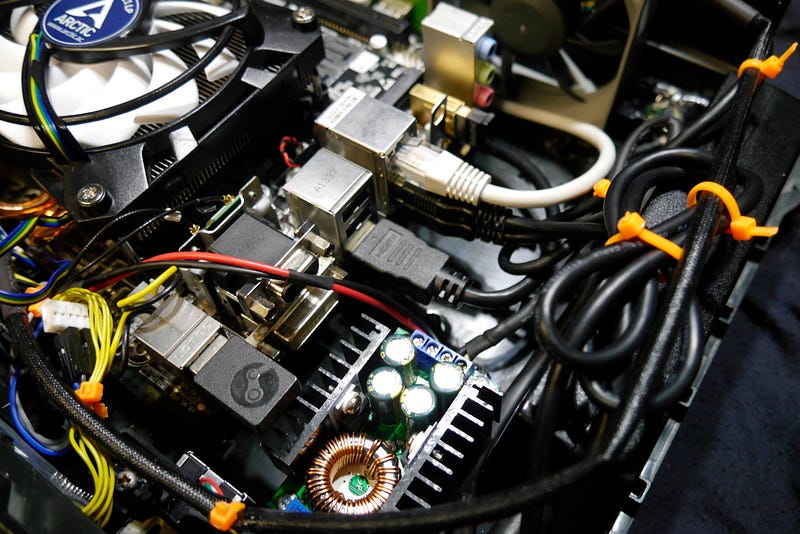
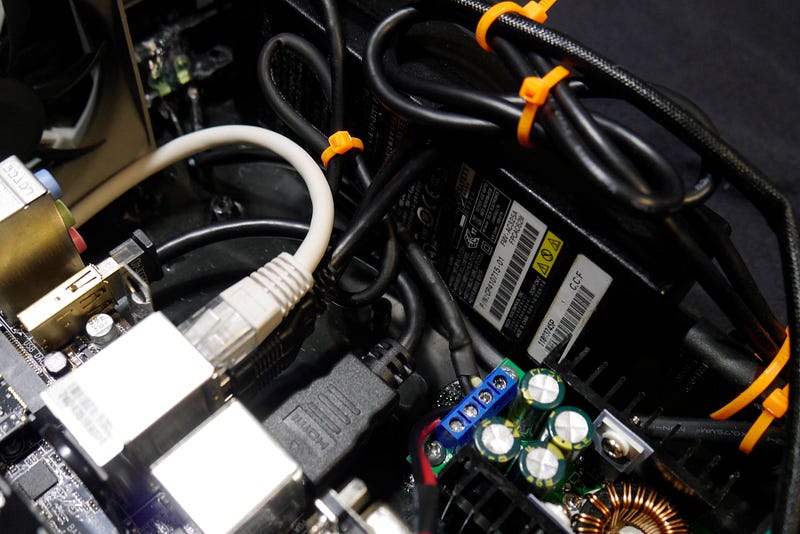
Looking closer at the right of the machine we can see the motherboard’s IO panel. 2 USB sockets are being used and are wired to the 2 original xbox controller connectors on the front of the machine (as this motherboard only has 2 on board USB socket headers which go to the other 2 front USB connectors). As I often use my steam controller I embedded it’s dongle inside. Behind the VGA socket we can see the M-PCIE wi-fi & BT adaptor. However as I only recently got this I had and have left in currently the USB BT adaptor in another port. Finally there is a HDMI cable and ethernet cable plugged in which go to ports on the back.
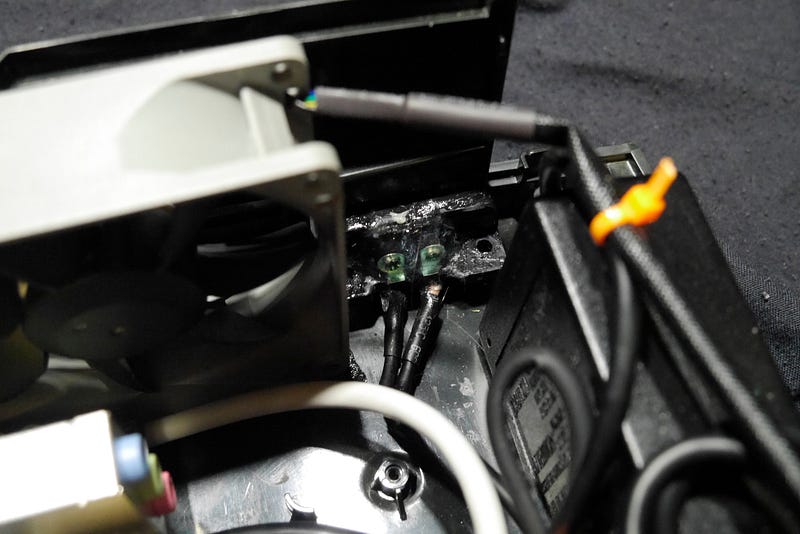
Following on from those two cables going to the back I also wanted to use the original figure of 8 socket (C8) and as the PSU I’m using is double isolated (meaning it doesn’t require earth) was as simple as wiring the socket to another figure of 8 cable. While I take care when powered on without the lid on when soldering this I heat shrunk a majority of it but then also coated the connector in resin creating a isolated layer of plastic around any exposed parts. I then tested for isolation using my electrical tester at 500V and it wasn’t able to measure any current when I touched it’s probe on multiple parts of the connector so if I accidentally touched it I would still be safe.
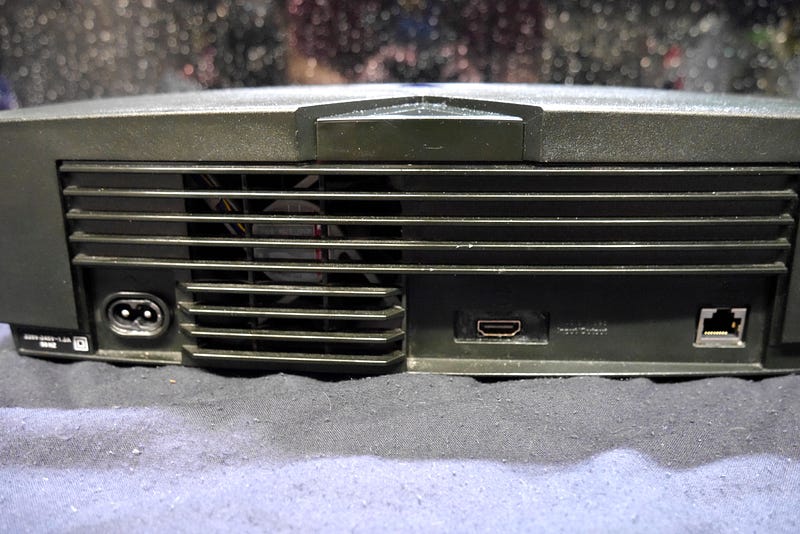
Then as we can see on the back the figure of 8 connector fits perfect. I 3D printed a little holder for the HDMI socket which I think is as close as I’ll get and spraypainted it black to match the case. And a 3D printed wedge for the ethernet socket which fits perfect in the same space.

And from the otherside you can see both sockets, the ethernet was an ethernet cable I chopped the end off and soldered to a PCB mount socket, the HDMI port was from a short extension I brought.
Moving onto the power supply, for this I’m using a 80W laptop power supply I had spare from my old dead laptop, this produces 19V at 4.2A so leads into a 9A buck module that is variable voltage and set to 12.2V. To help ensure this doesn’t change I placed a blob of super glue on the potentiometers to fix the value. Some picopsus regulate the 12V rail but this one does not so this was an important step.
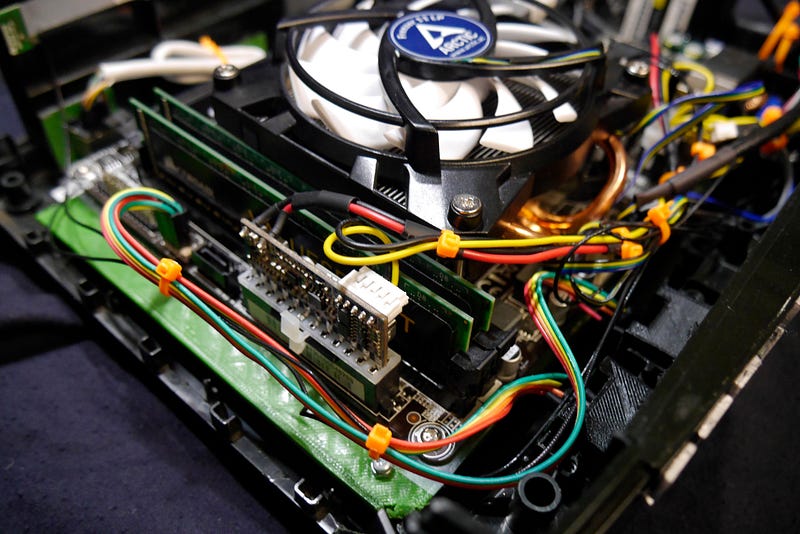
This then leads to the Pico-psu which connects to the motherboard’s 24 pin header and has an extra lead connecting to the 4 pin EPS connector on the motherboard too. The extra lead also had SATA and Molex connectors but I removed these to help tidy up the build as the SSD used is connected via msata.
You can also see best in the above photo the 3D printed base that was designed by PaulMDemers (which you can see my remix at https://www.thingiverse.com/thing:4305646). As my screws were quite close to the motherboard I also cut out and punched holes in a ohp transparency sheet to help prevent any short circuiting.
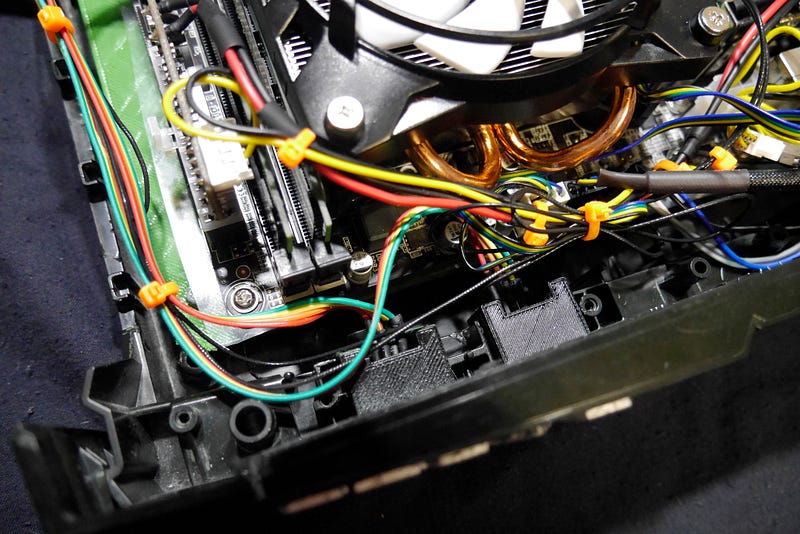
Here we can see the 2 USB ports I wired to the front, these were with a 3D printed wedge and PCB mount type A sockets which I soldered jumper wires too. These wires then connect to the 8 pin USB header.`
How does it perform?
This computer isn’t going to be up to AAA games of nowadays like Doom Eternal at ultra. Primarily down to using the iGPU which was a sacrifice I made to enable it to all fit inside including the power supply as many builds have the power supply as an external brick.
However my goal was essentially to make an XBOX 360 equivalent but quieter which this achieves. The LEGO Star wars games run in good quality video settings at 720p along with the Harry Potter games. As the Star Wars games are older it’s even faster along with Pinball Arcade.
For some other games it works well, Half Life 2 runs with ease benchmarking at over 170 FPS in high settings and even Bioshock Infinite and similar at around 30FPS in medium at 720p. These games are similar to what’s on the 360 so as expected (with HL2 even being on the original XBOX)
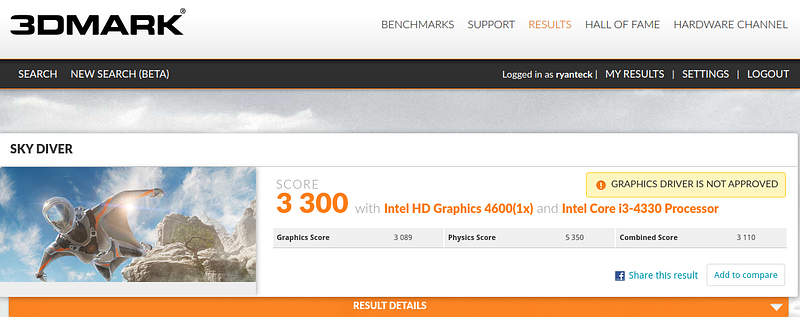
Finally in 3D Mark it scored 3,300 which while isn’t great for the size of the machine is rather good. https://www.3dmark.com/sd/5935107
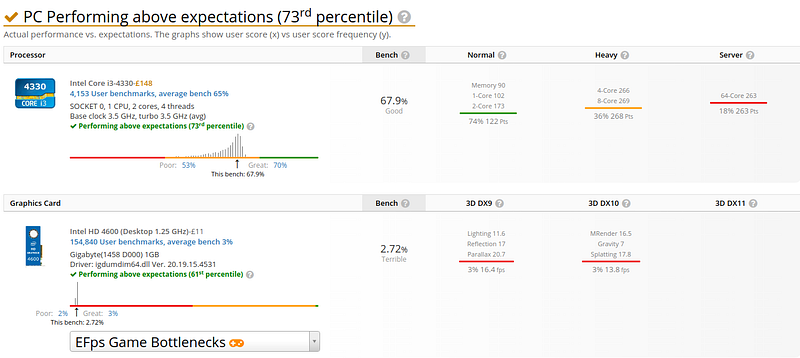
And in Userbenchmark while it doesn’t seem to like the SSD, on the CPU and iGPU scores it actually scores high for similar hardware. https://www.userbenchmark.com/UserRun/27395751?redirFrom=userbenchmark.com&
At the same time I limited the wattage of the CPU down to 42W (12W less than default TDP) and during 3D mark I had it hooked up to my electrical tester to measure power and didn’t measure more than 70W from the socket so power consumption was nice and low.
Steam Link
Plus for the latest top games it can double up as a Steam Link, which means it can easily stream games from my main computer which has a 5700XT for graphics and this actually works rather well as the actual Steam UI compared to steam link still runs on the machine itself meaning it’s just the game that has to be streamed.
Could I have done it better?
I would say that in my view this is pretty much perfect in terms of the modification. The logo’s came out really good in my view, the modifications aren’t that noticable from the outside and is really neat. It’s also surprisingly lightweight compared to the original which makes it good for if I want to take a machine on the go.
Future improvements
Primarily the biggest improvements to be made are with a better GPU, most I see use a bigger Pico PSU with the brick external to the machine. This enables more room inside the box for a descrete GPU but also the ability to have a bigger power supply to handle the extra power. But at the same time this would also increase the heat inside the unit.
The best upgrade would be to upgrade it to an AMD APU such as the 3200G which I would like to do in the future. However a few bits I have on the board including the M-sata SSD, PCI-E wi-fi adaptor, CPU cooler and even needing new RAM due to switching from DDR3 to DDR4 would all be involved and is more than I’m prepared to spend at the moment.
But this route would hopefully allow the same PSU to be used with just the switch of the motherboard, plus while it’s still an iGPU the Vega 8 Graphics compared to Intel 4600 is a major improvement but the TDP is stated to be around 20W more so could be too much.
But as said above for high end gaming I can just stream from my main PC which works well even via Wi-Fi as the machine has a 5GHZ Card that is testing at over 100Mbps connectivity.
Enjoy this project?
Thanks for reading this far and I hope you enjoyed this writeup for this project.
If you want any of the 3D Printed files you can find them at https://www.thingiverse.com/thing:4305646
If you want to see more projects like this, then you can also support me on Ko-Fi over at https://ko-fi.com/ryanteck
Originally Posted on Medium on the 29th of May 2020