Re-writing EDIDs on HDMI Dummy Plugs using an Raspberry Pi

For the last few months I've started to game exclusively over streaming, I have a dedicated gaming rig that I then can stream to a mixture of TVs, Computers & Android devices around my house.
To make this slightly easier to do I use a HDMI Dummy plug which is basically just a HDMI plug with an I2C Chip to present the EDID to the graphics card and make it think that a monitor or TV is plugged in.
Whilst this works fine, I have been wanting to experiment with HDR which the dummy plug I have doesn't say to the computer that the display is capable. I was then thinking that as it's just an I2C EEPROM there shouldn't be anything stopping me from re-flashing it or creating my own dongle with a custom programed EDID.
The benefit of doing it this way is that the profile that is on the dongle the exact EDID that my TV has will be presented to the computer.
There may be better ways on doing this, using other tools etc. However the below worked for me and is more of a log of what I done rather than the best way to do it.
The Tutorial
Disclaimer
This process may not work, try it at your own risk.
You'll need
- A Raspberry Pi, I did this on a Raspberry Pi 4 but it should theoretically work on others. You'll need this setup with an OS such as Raspberry Pi OS, but you only need the Lite version installed.
- Remote access - For this to be easier, I'd recommend you enable and setup your Raspberry Pi to be accessible via SSH so you can run the terminal commands on a laptop or desktop.
- Possibly - A HDMI adaptor, you may need a Micro or Mini HDMI to full size HDMI adaptor depending on the Model of Pi you're using and assuming you're using a HDMI dongle that is full size HDMI too.
- A HDMI Dongle, these are relatively cheap and available from multiple places. I used this one from Amazon, theoretically it shouldn't matter if you get a 1080p, 2k or 4k dongle as we're overwriting the profile anyway.
Step 1 - Dump the TV or Monitor's EDID that you wish to use.
1.1 - Prepping the Pi
The first step is dumping the EDID of the TV or monitor that you wish to dump the data from. Connect the Raspberry Pi to your TV / Monitor and power it up, then connect to it via SSH or such.
First we need to check / confirm the GPU driver is the correct one to be able to use the tvservice command. To do this you can use an editor like nano to confirm & / edit it.
You're looking for a line that if it's added will be either dtoverlay=vc4-fkms-v3d or dtoverlay=vc4-kms-v3d partially depending on what you may have configured previously. Ensure this is set to the fkms option, if it's the kms option change the line to the fkms one, save and reboot your Raspberry Pi.
1.2 - Dumping the data
Now we know the fkms driver is in use, we should be able to dump the EDID from the TV / Monitor.
Re-connect to the Pi via SSH or similar, and then run tvservice -d edid.dat , you can change the edid.dat to a different filename. But this command should then dump the TV's.
This will create a file (usually in your home directory) named edid.dat, you can confirm the file is correct by using a tool such as edid-decode edid.dat which will decode and display the data for the device. There's also tools online that you can upload the file to, to decode it such as https://edid.tv.
Step 2 - Write to the HDMI Dongle
2.1 - Prepping to write
Next we need to repeat / reverse what we did in step 1.1, and set the Raspberry Pi to use the kms driver instead. Once again open your /boot/config.txt again in your favourite editor and look for that same line that should be dtoverlay=vc4-fkms-v3d
Now edit the line to the kms driver by changing it to dtoverlay=vc4-kms-v3d and again save the configuration and reboot.
Re-connect to your pi, and unplug your TV / Monitor and instead plug in your HDMI Dongle. If you're using the Pi 4 make sure it's inserted into the HDMI 0 port (closest to the USB C Socket).
Finally we can confirm that the correct driver is loaded by seeing if the Raspberry Pi's i2c bus on the HDMI port is available. You can do this by scanning it with i2detect -y 20.
You should see in the 50 row that the number 50 shows, if you see this then the EEPROM on the dongle has been detected, if not try re-inserting it and re-running.
2.2 - Prepare to write
To write it, I found I needed a third party tool to write i2c. I found a site that referenced an EEPROM writing program which the link didn't work on. But handily wayback machine had archived it so I was able to download it from there.
I then ran the following on my Pi to download that file using wget.
wget https://web.archive.org/web/20220308192506if_/http://darkswarm.org/eeprog/eeprog-0.7.6-tear12.tar.gzAnd then extracted using tar -xzvf eeprog-0.7.6-tear12.tar.gz. Finally navigate into the folder and run make to build the package. (You may need to install build-essential to do this).
2.3 - Write!
Now confirming that your dongle is in the Raspberry Pi, we're ready to write.
Run this command to write the data, this assumes that the edid.dat is in your home folder. Adjust it if not.
cat ~/edid.dat | ./eeprog -f -w 0 -t 5 /dev/i2c-20 0x50And that's it! If it worked you should get a nice success message, if it doesn't then you may just need to re-try or see what error is produced. Whilst the HDMI Dongle I used didn't have the chip write protected others may.
Step 3 - Test
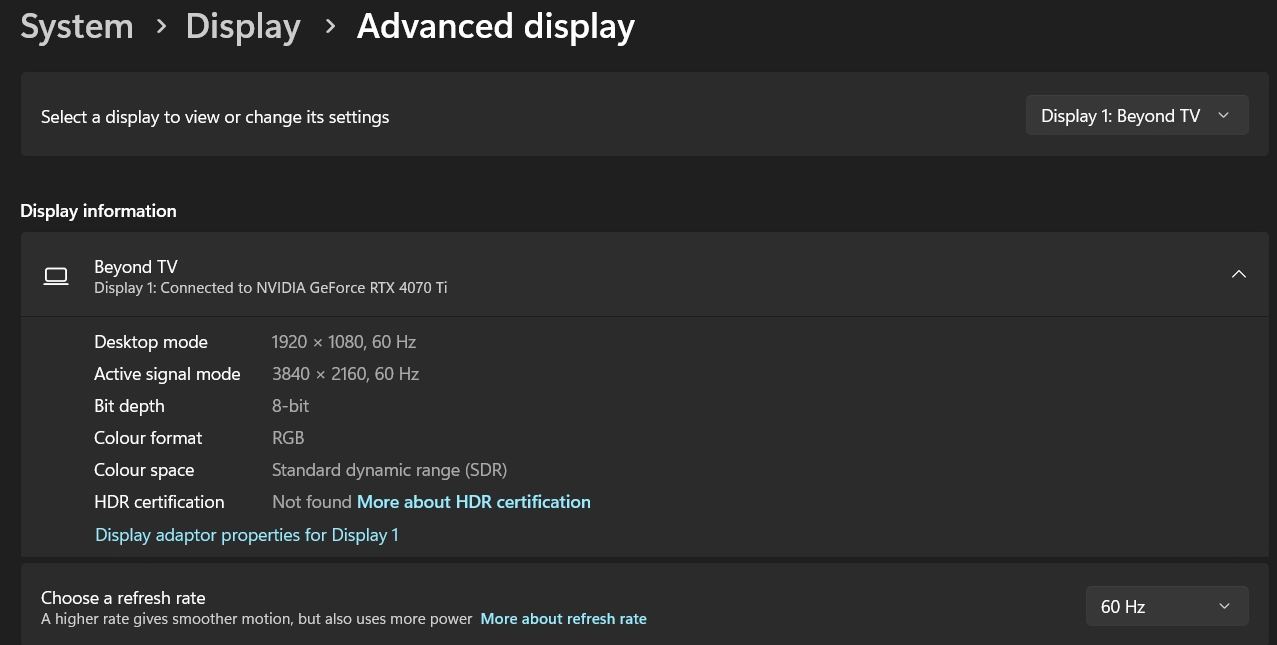
And the simplest test is the easiest, now plug it into the computer or such that you wish the fake display to be on. The windows gaming rig in my case thinks my TCL TV is connected even though it's just the dummy dongle.
Finishing up
Overall this was actually quite easy to do and didn't require any special tools to do it, I believe there are ways of doing it via windows directly but this method for me was slightly easier using hardware I had connected to the TV anyway.